Sudoku Solving Twitter Bot
It all started out with the idea of solving a sudoku puzzle from an image with some kind of computer vision. I searched on YouTube and found some examples with github projects about it. Quickly I found out that OpenCV is the way to go. In the following I will present you the steps a programm has to do to recognize a sudoku puzzle, its numbers, solve it and in the end reply it to a tweet. Use the list to navigate to the sections
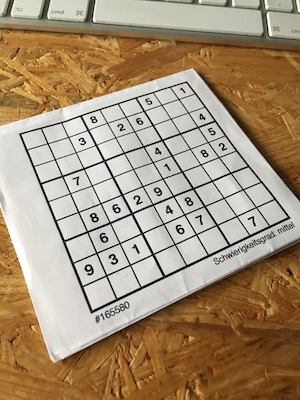
To make this project harder for me and learn a new language I decided to go with python. For the whole article we will use the following example image.
Sudoku Puzzle Recognition
In this section we want to recognize the sudoku puzzle and get an image like the following. For that we have to do three steps. You can find the code for this section in the image_processpr.py file.
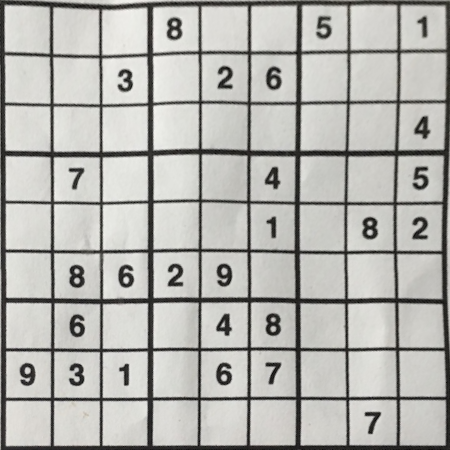
Image Preperation
Because working with huge images is costly let’s first resize the larger side of image to 800px if its above while keeping the aspect ratio.
1
2
3
4
5
6
7
8

height, width = img.shape[:2]
if height > 800 or width > 800:
    if height > width:
        captured = iu.resize(img, height=800)
    else:
        captured = iu.resize(img, width=800)
else:
    captured = img
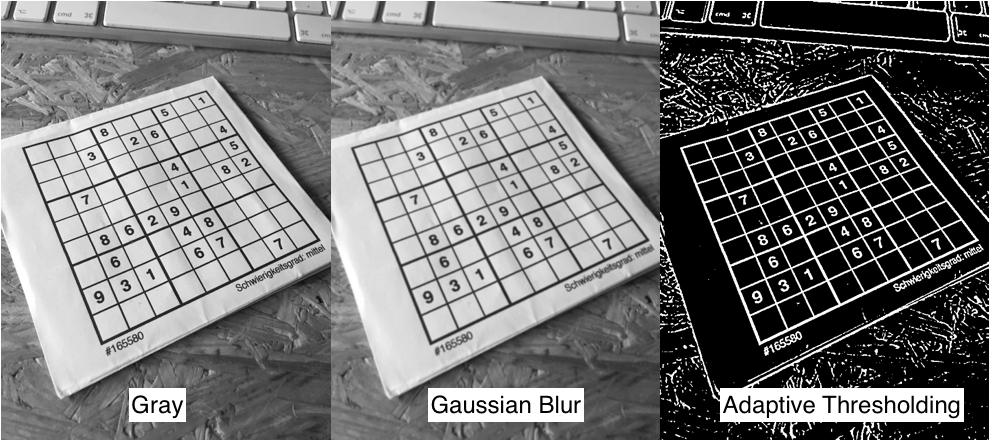
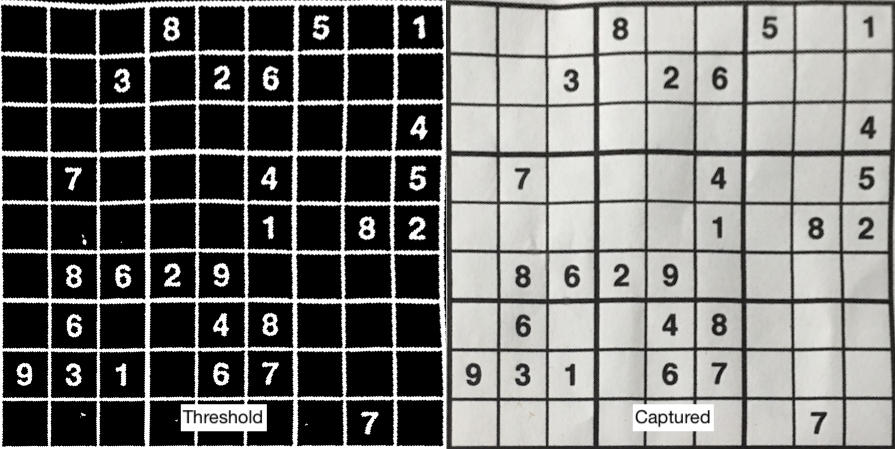
For better analysis of our image we remove the color. Then add a Gaussian blur filter for noise removal and do adaptive thresholding.
1
2
3
4
5
6

# remove color
gray = cv2.cvtColor(captured, cv2.COLOR_BGR2GRAY)
# noise removal with gaussian blur
gauss = cv2.GaussianBlur(gray,(5,5),0)
# then do adaptive thresholding
thresh = cv2.adaptiveThreshold(gauss,255,1,1,11,5)
The results look like this.
Get the four Corners
To get the four corners of the puzzle we first have to get all the conourts from our threshold image.
1
2

#find countours in threshold image
_, contours, _ = cv2.findContours(thresh, cv2.RETR_TREE, cv2.CHAIN_APPROX_SIMPLE)
For each contour we now can check the size and if it has four corners. We want to find the biggest square. If we can’t find a big square biggest stays None.
1
2
3
4
5
6
7
8
9
10
11
12
13
14

maxArea = 0
biggest = None
for i in contours:
    # gets the pixels of conour i
    area = cv2.contourArea(i)
    if area > 40000:
        # gets the corners
        epsilon = 0.1*cv2.arcLength(i,True)
        approx = cv2.approxPolyDP(i,epsilon,True)
        # check if biggest area and four corners
        if area > maxArea and len(approx)==4:
            maxArea = area
            biggest = i
            corners = approx
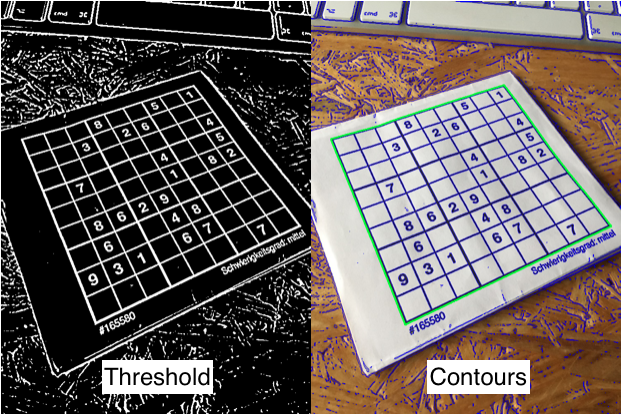
In this image we can see all contours found in the threshold image (blue) and the biggest square (green).
Rotate and Transform
Now we should have biggest and the corners as (x,y) tupels in corners. We assume that the sudoku on the image is in the right orientation (not rotated over 90° in any direction). We don’t get the corners in any specific order. So we first have to bring them in the right order of [top-left, bottom-left, top-right, bottom-right] with rotateCorners(corners).
After the perspectiveTransform and warpPerspective we get our rotated, transformed and cutted image.
1
2
3
4
5
6
7
8
9
10
11
12
13
14
15
16
17
18
19
20
21
22
23
24
25
26
27
28
29
30
31
32
33
34
35
36
37
38
39
40
41
42
43
44
45
46
47
48
49
50
51

if biggest is not None:
  #rotates the corners
  rotatedCorners = rotateCorners(corners)
  # create two point-arrays
  pts1 = np.float32(rotatedCorners)
  pts2 = np.float32([[0,0],[0,450],[450,0],[450,450]])
  # make the perspective transformation
  M = cv2.getPerspectiveTransform(pts1,pts2)
  # apply on the thresh and captured image
  cuttedThresh = cv2.warpPerspective(thresh,M,(450,450))
  cuttedOrig = cv2.warpPerspective(captured,M,(450,450))

[...]

def rotateCorners(self, corners):
        # rotates the values of corners always in the same order
        # top-left, bottom-left, top-right, bottom-right

        tl = None # top left
        bl = None # bottom left
        tr = None # top right
        br = None # bottom right

        # getting the tl and br by getting the smallest
        # and biggest sum of the corner tupel
        biggest = 0
        smallest = 1000000
        rest = []

        for corner in corners:
            added = corner[0][0] + corner[0][1]
            if added > biggest:
                biggest = added
                br = corner[0]
            if added < smallest:
                smallest = added
                tl = corner[0]

        # getting the bl and tr corners
        for corner in corners:
            if not np.array_equal(corner[0], br) and not np.array_equal(corner[0], tl):
                rest.append(corner[0])
        if len(rest) == 2:
            if rest[0][0] > rest[1][0]:
                bl = rest[1]
                tr = rest[0]
            else:
                bl = rest[0]
                tr = rest[1]

        return [[tl], [bl], [tr], [br]]
We get our rotated, transformed and cutted image as threshold and from the captured image.
Digit Recognition
For the digit recognition we use the machine learning library of OpenCV. More specificly the k-nearest implementation of the library. After we created the model we can easily loop through the sudoku and predict the digit of eacht field.
Machine Learning Model
Firstly we create training data to train the machine learning model. You can find the train-algorithm-code in the ml folder of the repository. The output of the code are generalsamles.data and generalresponses.data.
In the ocrClass of the image_processor.py we create a model and train it with this samples- and responses-data.
1
2
3
4
5
6
7
8
9

def __init__(self):
    # loading the data
    samples = np.loadtxt('ml/generalsamples.data',np.float32)
    responses = np.loadtxt('ml/generalresponses.data',np.float32)
    responses = responses.reshape((responses.size,1))

    # model uses kNearest to perform OCR
    model = cv2.ml.KNearest_create()
    model.train(samples, cv2.ml.ROW_SAMPLE, responses)
Get the Digits
We start by creating an array filled with zeroes, which means the field is empty. After that we get all contours of the cutted threshold image and loop through each contour area, which then should be our digits. To be sure we check them for their size. Then we can recognize the digit with our machine learning model by calling the function getNumber of the ocrClass.
1
2
3
4
5
6
7
8
9
10
11
12
13
14
15
16
17
18
19
20
21

def readSudoku(self):
    ocr = ocrClass()
    sudoku = np.zeros([9,9],dtype=np.uint32)

    # finding all conours from the cutted threshold
    _, contours,_ = cv2.findContours(cuttedThresh, cv2.RETR_LIST, cv2.CHAIN_APPROX_SIMPLE)

    for i in contours:
        area = cv2.contourArea(i)
        if area > 50:
            [x,y,w,h] = cv2.boundingRect(i)
            # checking size
            if h > 15 and h < 45 and w > 8 and w < 45:
                # recognize the digit
                roi = cuttedThresh[y:y+h,x:x+w]
                num = ocr.getNumber(roi)

                # getting the position of the digit
                sudox = int((x+(w/2))//50)
                sudoy = int((y+(h/2))//50)
                sudoku[sudoy][sudox] = num
In the getNumber function we resize the given thresholded image of the digit and use the findNeares of the ml library to predict the digit.
1
2
3
4
5
6
7

def getNumber(self, img):
    roi = cv2.resize(img, (25,35))
    roismall = roi.reshape((1,875))
    roismall = np.float32(roismall)
    _, results, _, _ = self.model.findNearest(roismall, 1)
    predictedNum = int(results[0][0])
    return predictedNum
Solving Algorithm
There are less and more comlex ways to implement a sudoku puzzle soling algorithm. You can find a very interesting lecture on the subject from Srini Devadas here. Instead of implementing the algorithm myself and because my focus lies on the computer vision part of this project, I ended up using Peter Norvigs code. He describes it in detail on his website. I realy recommend to read it!
Twitter Bot
While finishing up the code I thought about how to publish the sudoku solver for others to use. And because I like the existence of more or less useful twitter bots and always wanted to develope my own, this was the right opertunity for it.
The goal ist to create a bot where you can send tweets at and which replys with the solved puzzle.
Create and Setup Twitter App
To get events from twitter to our application we have to use a webhook, which we have to register and connect to out application.
First we need to create a new twitter app here (You have to register for a twitter developer account if you haven’t yet). We fill in all required fields.
After we created the app we have to setup its permissions under ‘Permissions’ > ‘Access’ section > enable Read, Write and Access direct messages. Now we can get the credentials under ‘Keys and Access Tokens’ > ‘Your Access Token’ section > after clicking ‘Create my access token’ button. We now have our consumer key, consumer secret, access token and access token secret. These credentials are later used to connect our application to twitter. We will provide them to our application via environment variables.
Setup Flask Server
For simplicity we use a simple Flask server to deploy out application. For the twitter webhook we need a route /webhook with two http methods:
1. GET
This is needed to perform a CRC check and confirm the identity of our application-server.
1
2
3
4
5
6
7
8
9
10
11
12
13
14

@app.route("/webhook", methods=["GET"])
def twitterCrcValidation():
    crc = request.args['crc_token']
    validation = hmac.new(
        key=bytes(CONSUMER_SECRET, 'utf-8'),
        msg=bytes(crc, 'utf-8'),
        digestmod = hashlib.sha256
    )
    digested = base64.b64encode(validation.digest())
    response = {
        'response_token': 'sha256=' + format(str(digested)[2:-1])
    }
    print('responding to CRC call')
    return json.dumps(response)
2. POST
This is the actual route Twitter is sending all events to. Here we have to implement whats happening on different event types twitter is providing to us. For now we want to react to tweet_create_events.
1
2
3
4
5
6
7
8
9
10
11
12
13
14
15
16
17
18
19
20
21
22
23
24
25
26
27
28
29

@app.route("/webhook", methods=["POST"])
def twitterEventReceived():
    requestJson = request.get_json()

    if 'tweet_create_events' in requestJson.keys():
        #Tweet Create Event
        likeObject = requestJson['tweet_create_events'][0]
        userId = likeObject.get('user', {}).get('id')
        username = likeObject.get('user', {}).get('screen_name')
        twtId = likeObject.get('id_str')

        #event is from myself so ignore
        if userId == CURRENT_USER_ID:
            print("Received own tweet with tweet-id " + twtId)
            return ('', HTTPStatus.OK)

        #someone replyed to my reply
        if likeObject.get('in_reply_to_status_id'):
            print("Received a reply to tweet-id " + twtId)
            return ('', HTTPStatus.OK)

        print("Received tweet from" + username + " with tweet-id " + twtId)
        main.solveTweet(likeObject, True)

    else:
        #Event type not supported
        return ('', HTTPStatus.OK)

    return ('', HTTPStatus.OK)
When we reply to a tweet, this route triggers again. Bacause we don’t want to reply to our own responses on tweets we have to ignore them (line 13 following). It’s the same with replys from other users (line 18 following).
All the magic is then happening in line 23 main.solveTweet(likeObject, True).
Process received Tweet and reply
1
2
3
4
5
6
7
8
9
10
11
12
13
14
15
16
17
18
19
20
21
22
23
24

def solveTweet(twt, reply):
    api = auth()
    twt_username = twt["user"]["screen_name"]
    twt_id = twt["id"]
    if "media" in twt["entities"]:
        for media in twt["entities"]["media"]:
            if media["type"] == "photo":
                url = media["media_url"]
                print ("Try to solve tweet with id", twt_id)
                print(url)
                img = io.imread(url)
                solvedImg = imp.getSolvedImage(img)
                if solvedImg is not False:
                    file_path = "solution.png"
                    cv2.imwrite(file_path, solvedImg)
                    print ("-> Sudoku solved !")
                    message = "@" + twt_username + " I solved your Sudoku! Is this the right solution?"
                    if reply: replyTweet(api, twt_id, twt_username, 0)
                else:
                    print ("-> Couldn't solve Sudoku")
                    if reply: replyTweet(api, twt_id, twt_username, 1)
    else:
        print ("No image found in this tweet", twt_id)
        if reply: replyTweet(api, twt_id, twt_username, 2)
In the solveTweet function we extract the username and the image of the received tweet. There are three possibilities we have to reply to:
- There is no image in the received tweet
- Our algorithm wasn’t able to solve the sudoku
- The puzzle has been solved
1
2
3
4
5
6
7
8
9
10
11
12
13
14
15

def replyTweet(api, twt_id, twt_username, state):
    if state == 0:
        file_path = "solution.png"
        message = "@" + twt_username + " I solved your Sudoku! Is this the right solution?"
        api.PostUpdate(message, media=file_path, in_reply_to_status_id=twt_id)
    elif state == 1:
        message = "@" + twt_username + " I can not solve the sudoku. Sorry!"
        api.PostUpdate(message, in_reply_to_status_id=twt_id)
    elif state == 2:
        message = "@" + twt_username + " There is no sudoku to solve. Pleas add an image with a sudoku."
        api.PostUpdate(message, in_reply_to_status_id=twt_id)
    else:
        print("Nothing replyed!")
        return
    print ("-> Replyed !")
Run
Following instructions relate to the project on Github.
Setup Bot
-
Install python requirements
1

 pip3 install -r requirements.txt
-
Define key variables locally using the keys, access tokens noted previously and your twitter user id from gettwitterid.com
1
2
3
4
5
6

 export CONSUMER_KEY={INSERT_CONSUMER_KEY}
 export CONSUMER_SECRET={INSERT_CONSUMER_SECRET}
 export ACCESS_TOKEN={INSERT_ACCESS_TOKEN}
 export ACCESS_TOKEN_SECRET={INSERT_ACCESS_TOKEN_SECRET}
 export PORT={INSERT_FLASK_PORT}
 export CURRENT_USER_ID={INSERT_USER_ID}
Deploy Bot
- Start the flask server
1

python3 server.py
- Make sure your flask server is public (for example with a nginx to https://your-domain.com/twitter)
Setup Twitter Webhook
-
Setup Bot and Deploy the Bot
-
On Account Activity API/Sandbox > Set up dev environment button > add Dev environment label
-
Define environment variables locally using your Dev environment label and your webhook url like https://your-domain.com/twitter (replace the text after the =)
1
2

 export ENV_LABEL={INSERT_ENV_LABEL}
 export WEBHOOK_ULR={INSERT_WEBHHOK_URL}
-
Add your URL as webhook
1

 python webhook-scripts/create-webhook.py
-
Subscribe your twitter account to the created webhook
1

 python webhook-scripts/subscribe-webhook.py
Try it
Send a sudoku to @easySudoku. Hopefully you get a reply with a correct solved puzzle.